Why image compression matters
Large images make everyday work slower. They can fail email attachment limits, take longer to upload to a website, make blog pages feel heavy, and slow down product pages or portfolios. The image may look fine on your screen, but the file can still be much larger than it needs to be.
Online image compression solves this by reducing file size while keeping the image practical for real use. The goal is not to destroy quality. The goal is to remove unnecessary weight so the image is easier to send, upload, publish, or store.
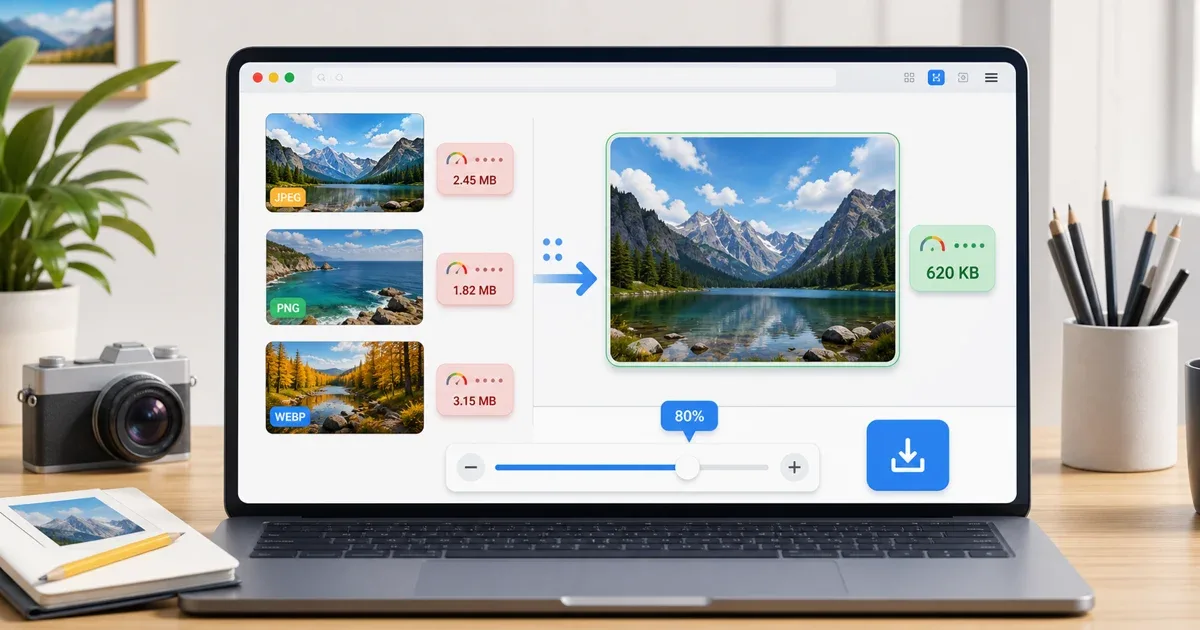
The Image Compressor on IGY Apps supports JPEG, PNG, and WebP images. You can drop or select images, adjust a quality slider, see the original and compressed sizes, then download each compressed image or download all results at once.
When to compress an image
Compress an image when the dimensions are already correct but the file is still too large. For example, a blog cover may already be 1200 pixels wide, but it might still be several megabytes because it was exported at a high quality setting. In that case, compression is the right first step.
Compression is also useful before uploading images to websites, sending screenshots to clients, attaching photos to email, or preparing images for a lightweight landing page. Smaller files save bandwidth and make pages feel faster, especially on mobile connections.
If the image is too wide or too tall, use Resize Image first. Resizing changes the actual dimensions. Compression changes how efficiently the image is stored. The best workflow often uses both: resize to the real display size, then compress the result.
How the Image Compressor works
The tool is designed to be simple. Open Image Compressor, drop your JPEG, PNG, or WebP images into the upload area, or click to browse from your device.
After the images are loaded, adjust the quality slider. The default value is 80%, which is usually a good balance for web use. Higher quality keeps more detail but produces a larger file. Lower quality makes the file smaller, but it can introduce visible artifacts, especially in gradients, faces, product photos, or screenshots with text.
Once the results are ready, compare the original and compressed file sizes. Download one image if you only need a specific result, or use Download All when you compressed several images together.
The important privacy detail is that the compression runs locally in the browser using the Canvas API. Your images do not need to be uploaded to a remote server for this workflow.
JPEG, PNG, and WebP behave differently
JPEG is usually best for photos. It compresses photographic detail well, but it does not support transparency. If the image contains a normal photo, a product shot, or a social media image without transparent areas, JPEG compression can save a lot of space.
PNG is better for transparency, icons, interface screenshots, diagrams, and sharp edges. PNG files can be larger, especially for photos, but they preserve clean lines well. When compressing PNG, compare the final image carefully if the file includes small text or fine UI details.
WebP is a strong choice for modern websites. It often gives a good balance between quality and file size. If your workflow needs format conversion, use WebP Converter. The Image Compressor keeps the same output format as the original, while the converter is the better tool when you want to change format.
A practical quality setting
Start at 80%. For many web images, this is a sensible first test. If the image still looks clean and the file size is much smaller, keep it.
For high-detail photos, try 75-85%. For simple graphics, screenshots, or images with text, stay a little higher and check readability. For casual sharing where perfect quality is not critical, you can try lower settings, but always open the downloaded result once before sending it.
Avoid judging only by the percentage. A 70% export may look fine for one image and poor for another. The best setting depends on the content of the image.
Compression vs resizing vs editing
Use compression when the file is too heavy. Use resizing when the image dimensions are larger than needed. Use cropping when the image includes empty or distracting areas. Use editing when you need text, shapes, annotations, or a visual change.
For a full visual workflow, use Image Editor. You can crop, add text or shapes, transform the image, and export it. After that, use compression if the exported file is still too large.
For a website workflow, a common order is:
- Crop the image if the frame is wrong.
- Resize it to the real display size.
- Convert to WebP if your site supports it.
- Compress the final image.
- Open the downloaded file and check the result.
Common mistakes to avoid
Do not compress the original image over and over. Keep the original file safe, then create a compressed copy. Repeated compression can slowly damage quality.
Do not use the lowest quality setting just because it creates the smallest file. A tiny file is not useful if faces look rough, product details disappear, or text becomes difficult to read.
Do not upload huge images to a website and expect CSS to solve the problem. A 4000-pixel image displayed at 800 pixels still forces visitors to download unnecessary data.
Do not treat every image format the same way. Photos, screenshots, icons, and transparent images need different choices.
Final recommendation
Use Image Compressor when you need to reduce JPG, PNG, or WebP file size quickly from the browser. Start with the 80% quality setting, compare the savings, and download a smaller copy that still looks clean.
If dimensions are the problem, use Resize Image. If the format is the problem, use WebP Converter. If the image needs visual changes first, use Image Editor, then compress the final export.